By David Foley
14th March 2017
Posted in PHP, Web Dev, WordPress
If you’re creating your own WordPress theme and you want to include functionality to enable users to send out emails, then you will need to set up a mail template.
Before we get into creating a mail template, we need a way to test the mail functionality and a way to preview the created emails.
Fortunately for us there’s Mailtrap. Mailtrap is a fake SMTP server for development teams to test, view and share emails sent from the development and staging environments without spamming real customers.
Although Mailtrap offers paid for services, it also offers a limited free plan which is all we will need.
Adding Mailtrap to WordPress
Step 1:
Sign up for a free Mailtrap account and log in.
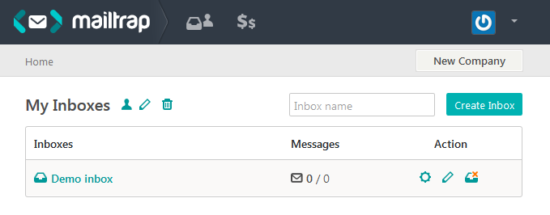
Once you have signed up and logged in you will be directed to your inboxes page as seen below.
Step 2:
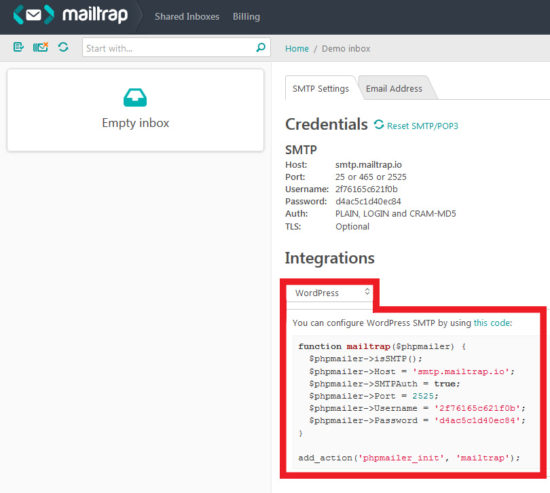
For this demonstration we will be using the Demo Inbox, click the ‘Demo inbox’ text to enter the inbox and you will be directed to the page below. This is the page where you can view your test emails later on, but for now all we are after is the code snippet to put into our WordPress project. To retrieve this snippet head to the Integrations section and change the drop-down to ‘WordPress’. The code snippet will then change to the WordPress function that we need.
Step 3:
Open up your WordPress project and locate the functions.php file, which should be located inside themes/yourthemename/
Copy the snippet of code from the previous step into the functions.php file.
Step 4:
That’s it! Every email you send now on your WordPress site will now appear in the Demo Inbox on Mailtrap.
*Note: Just remember to comment out the snippet once you put your site live!
Creating mail templates
Now that we have a way to test and preview our emails, we can begin creating our mail templates. For this demonstration I will be using a simple example where I am just going to insert a product name and a product description into a simple email template which I have already created.
Step 1:
Make a new HTML file called demo-mail.html, I’ve created the directory /includes/mail in my theme folder for organisation purposes, however feel free to create the file wherever you feel is suitable.
For this demonstration copy the code below into demo-mail.html and save the file.
<!DOCTYPE html PUBLIC "-//W3C//DTD XHTML 1.0 Transitional//EN" "http://www.w3.org/TR/xhtml1/DTD/xhtml1-transitional.dtd">
<html xmlns="http://www.w3.org/1999/xhtml">
<head>
<meta http-equiv="Content-Type" content="text/html; charset=UTF-8">
<title>Demo</title>
<meta name="viewport" content="width=device-width, initial-scale=1.0">
</head>
<body style="font-family: "Helvetica Neue",Helvetica,Arial,sans-serif;background: #FEFEFE;color: #111;margin: 0;padding: 0;">
<table align="center" class="container-fluid navbar navbar-default" style="border-collapse: collapse;border-spacing: 0;width: 100%;text-align: center;margin: 0 auto;background: #FEFEFE;color: #111;">
<tr class="row black-bg" style="background-color: #333D47;">
<td colspan="12" class="text-center" style="text-align: left;font-family: "Helvetica Neue",Helvetica,Arial,sans-serif;font-size: 16px;padding: 16px;"></td>
</tr>
</table>
<table align="center" class="container jumbotron" style="border-collapse: collapse;border-spacing: 0;width: 100%;max-width: 600px;margin: 0 auto;text-align: center;background: #FEFEFE;">
<tr>
<td colspan="12" class="text-center title" style="text-align: center;font-size: 35px;font-family: arial;color: #333D47;padding: 16px 0;">
Demo Mail
</td>
</tr>
<tr>
<td colspan="12" class="text-left subtitle" style="text-align: left;font-family: arial;color: #333D47;padding: 0;font-size: 18px;">
[[ProductName]]
</td>
</tr>
<tr>
<td colspan="12" class="text-left subtitle" style="text-align: left;font-family: arial;color: #333D47;padding: 0;font-size: 18px;">
[[ProductDescription]]
</td>
</tr>
</table>
<br>
<table align="center" class="container-fluid navbar navbar-default" style="border-collapse: collapse;border-spacing: 0;width: 100%;text-align: center;margin: 0 auto;background: #FEFEFE;color: #111;">
<tr class="row black-bg" style="background-color: #333D47;">
<td colspan="12" class="text-center" style="text-align: left;font-family: "Helvetica Neue",Helvetica,Arial,sans-serif;font-size: 16px;padding: 16px;"></td>
</tr>
</table>
</body>
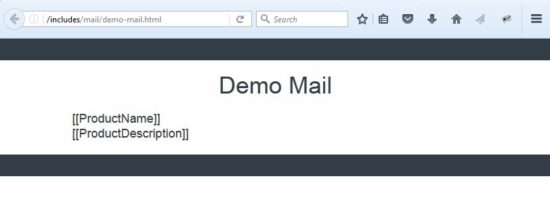
</html>If you look at the file locally you will see the page below.
What we are going to do is replace the text that says [[ProductName]] and [[ProductDescription]] with our data and then send it as an email.
Step 2:
Normally we would send an email after a user has submitted a form, to simulate this we are going to add a simple form which asks the user for their email address on our WordPress site.
I’m going to add the form to my single.php file but once again you can place it elsewhere if suitable.
Copy the below code into your project.
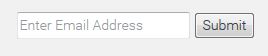
<form action="" id="form-email-signup" method="post">
     <label for="email" class="sr-only">Email: </label>
     <input name="email" type="email" placeholder="Enter Email Address">
     <input type="submit"  value="Submit">
</form>
The form will output as below.
Step 3:
Now we need to catch the form post, add the below code to the top of the page where you inserted the form.
if($_POST['email'])
{

}
Step 4:
Inside this if statement is where we will eventually send our email, however we first need to replace the email template with our own content. Replace the code above with the below code onto your page.
if($_POST['email'])
{
        $template = file_get_contents(__DIR__."/includes/mail/demo-mail.html");

        $template = str_replace("[[ProductName]]", 'Awesome Product', $template);
        $template = str_replace("[[ProductDescription]]", 'This product is amazing!', $template);
}
In the code below we are assigning the variable $template the entire contents of our demo-mail.html file which we created earlier.
Then we are simply using the PHP str_replace() function to replace the placeholder text, now part of a long string in our $template variable, of [[ProductName]] and [[ProductDescription]] with our own data of 'Awesome Product' and 'This product is amazing!' respectively.
Step 5:
Now that we replaced the placeholders in our email template we are ready to send our email! Replace the code above with the below code onto your page.
if($_POST['email'])
{
        $template = file_get_contents(__DIR__."/includes/mail/demo-mail.html");

        $template = str_replace("[[ProductName]]", 'Awesome Product', $template);
        $template = str_replace("[[ProductDescription]]", 'This product is amazing!', $template);

        $to = $_POST['email'];
        $subject = 'Demo Subject';
        $body = $template;
        $headers = array('Content-Type: text/html; charset=UTF-8');

        wp_mail( $to, $subject, $body, $headers );
}
After replacing our placeholders, we are now setting up our email before sending it off. Making the recipient of the email the email address that the user submitted on the form via using $_POST['email'] . Adding a subject to the email as 'Demo Subject', followed by making the body of the email the $template variable which we earlier replaced the placeholders with our own data. It is also important to pass the correct headers to the email to make sure it outputs as HTML, this is achieved via the array('Content-Type: text/html; charset=UTF-8'); part of the code.
Once we have set up our email parameters we can pass these parameters to the WordPress function wp_mail which will send our email for us! Submit the form to test the functionality.
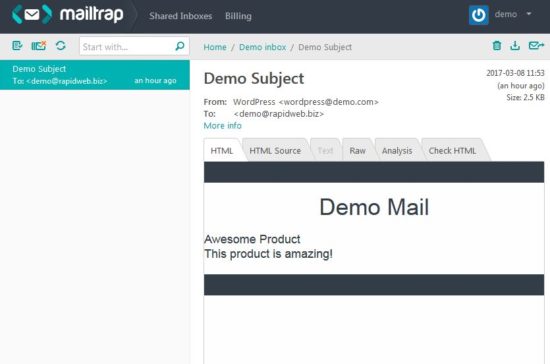
Step 6:
“But how do I know if the email sent correctly?” I hear you ask. Well luckily for us we set up Mailtrap earlier. So now if you head to the Demo Inbox you should be greeted with a fresh new email which displays our demo-mail.html with the placeholders replaced as seen below.
That concludes this blog post, however if you’re interested in creating and styling your own responsive HTML mail file, I suggest you check out MailGrid, one of our open source projects.